Creating a simple platformer game using Kaboom.js
Show Table of Contents
📝 TLDR: I built a game, you can try it out here 🕹️
Preface
I've always enjoyed gaming. From a very young age, I recall playing a myriad of video games on my bulky Intel Pentium II PC: Flight Simulator 95, Empire Earth, Age of Mythology, Rise of Nations, and many, many more. Over the years, the systems I played on gradually improved, and I found myself discovering and enjoying new genres, with a sweet spot for city building, strategy, and role-playing games. As a kid, the idea of building a video game from scratch always baffled me: "How does it work?", "What is it made of?", "How do the moving parts fit together?"; it always seemed so abstract, almost magical. In fact, it was a bit like a black box to me: as a child, all I knew was that I could interact with the game, (e.g. keyboard inputs) and get something out of it (e.g. visual feedback). How the input was processed and the machine produced an output was incomprehensible to me.
Nowadays, I know that, as with any other field, game development has its own fundamental rules and mechanics. This blog post focuses on a small game development project. I made this platformer game just for fun and to gauge how difficult it is, in 2024, to build a game from scratch (well, not entirely since I'm using a library that takes care of the big bulk of mechanics required to make a platformer game).
Building NinJump
Setting up the requirements
As with any new project I embark on, the first step is to set out on a quest to find the most appropriate set of libraries to use.
As the idiom goes: "We don't want to reinvent the wheel".
After some digging around, I settled for the following:
- JavaScript runtime: bun
- Game programming library: Kaboom.js
- Assets: Pixel Adventure
- Font: Jersey 10
The reasons why I went with Kaboom.js are for its apparent ease of use, the provided examples, and for enabling rapid prototyping (that is, even if I ended up disliking it, I could just abandon the project without feeling the remorse of time lost invested in learning it). Another reason was that I wanted to practice my JavaScript skills a bit.
Designing the welcome screen
The game is set at a resolution of 512x320 pixels. With the Kaboom.js library, we can work with a tilemap1; for this game I have defined each tile to be 16x16 pixels.
Designing the welcome screen was easier than I anticipated, all it took was designing a small level (i.e. just the background scene), fixing the position of the player, adding some text for the user to know what to do (in this case, pressing SPACE to start the game, or pressing R to show the scoring matrix), and lastly, adding a logo! It's worth saying that the logo was generated using AI.
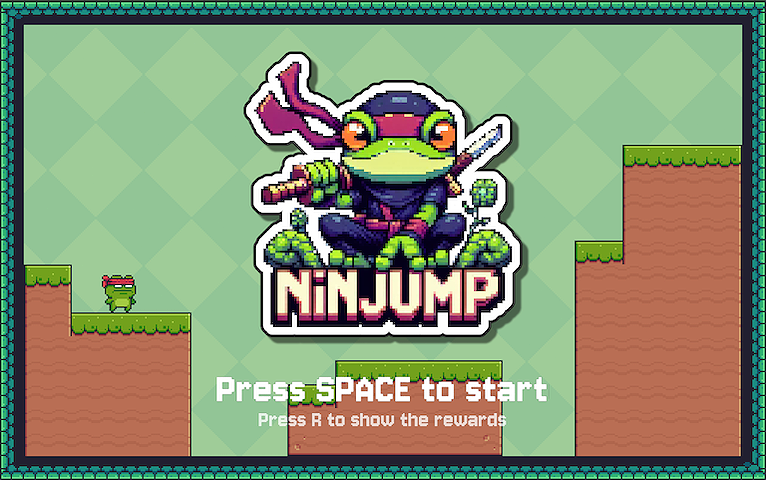
NinJump - Welcome screen.
Project structure
In an effort to make the project more modular, and therefore easier to read and maintain, I came up with the following file structure:
src
├── config
│   └── levelConfig.js // Configuration file for levels
├── entities
│   └── player.js // Define the player entity
├── scenes
│   ├── controls.js // Code for the rewards scene
│   ├── levels.js // Code for the levels scenes
│   └── menu.js // Code for the menu scene
├── utils
│   ├── loader.js // Code for loading game assets
│   └── ui.js // Code for user interface components
└── main.js // Main entry point of the game
Configuration files are stored in the config/ directory, entities such as players or enemies are stored in the entities/ directory, and scenes and utilities are stored in the scenes/ and utils/ directories, respectively. The main.js file is the main entry point of the game. The most important parts of the game are declared here, including:
- Initialisation of the Kaboom.js game engine:
import kaboom from "kaboom";

kaboom({
  width: 512,
  height: 320,
  letterbox: false,
  scale: 1.5,
  font: "jersey",
});
- Loading the game assets (i.e. fonts, sprites, entities):
import { load } from "./utils/loader";

load.fonts();
load.items();
load.player();
load.sounds();
load.terrain();
load.traps();
- Declaring global variables (i.e. current level, score, and scoring dictionary):
export let currentLevel = 1;
export let score = 0;
export const FRUIT_SCORES = {
  apple: 1,
  banana: 1,
  cherry: 2,
  kiwi: 2,
  orange: 3,
  pineapple: 3,
  strawberry: 4,
  watermelon: 5,
};
Creating a Makefile
For projects that require long tedious commands to perform regular tasks (e.g. generating a build or preview, running some tests, setting and cleaning up the environment), I got into the healthy (I think 🤭) habit of writing up a Makefile. This file lets us conveniently define a set of rules. I won't get into details for this blog post as you can easily find proper documentation elsewhere, but it's safe to say that if you haven't heard of Makefile yet, go and read a bit about it as it will surely help you in the long run when it comes to streamlining the development workflow of a larger project, saving you sweat and tears (and time!) writing those boring commands.
For this project, the commands I included in the Makefile are used in setting up the environment (install), updating the dependencies (update), cleaning up the environment (clean), building the project (build), running in development mode (dev), running the build (run), and lastly showing the commands available in the Makefile (help).
.PHONY: install update clean build help

install: ## Install dependencies
 bun install

update: ## Update dependencies
 bun update

clean: ## Clean up the project
 rm -rf node_modules dist

build: install ## Build project
 rm -rf dist
 bun run esbuild src/main.js --bundle > build.js
 mkdir dist
 mv -f build.js dist/.

dev: build ## Run project in development mode
 bun run dev

run: build ## Run project in production mode
 bun run start

deploy: build ## Deploy project to GitHub Pages
 cp -rf assets dist/.
 cp index.html dist/.
 cp styles.css dist/.
 sed -i '' 's|dist/build.js|build.js|g' dist/index.html
 gh-pages -d dist

help:
 @grep -E '^[a-zA-Z_-]+:.*?## .*$$' $(MAKEFILE_LIST) | sort | awk 'BEGIN {FS = ":.*?## "}; {printf "\033[36m%-10s\033[0m %s\n", $$1, $$2}'
Running any of these commands is as straightforward as it can be, simply run: make <command>.
The help recipe2 isn't readable, I admit. But all it does is list the available make rules3. Running make help will yield the following to the terminal:
❯ make help
build      Build project
clean      Clean up the project
deploy     Deploy project to GitHub Pages
dev        Run project in development mode
install    Install dependencies
run        Run project in production mode
update     Update dependencies
Implementing some logic
Generating random fruits
Each level is defined in a JavaScript object (in the scenes/levels.js file) that behaves similarly to a dictionary in Python. In this file, fruits are defined as a single character f which is itself defined in another JavaScript object (in the config/levelConfig.js) and for which the respective sprite is first loaded by the loader (located at utils/loader.js). The f can represent any of the 8 defined fruits and each fruit is associated with a specific score. Consuming the fruit (i.e. passing on top of it with the player) will yield a specific reward that will be incremented on the current score value. To add some chaos to the game, I created a random fruit generator 🍎 🍊 🍉
level.get("fruits").forEach((fruit) => {
  const fruits = Object.keys(FRUIT_SCORES);
  const randomFruit = fruits[Math.floor(Math.random() * fruits.length)];
  fruit.name = randomFruit;
  fruit.play(randomFruit);
});
In a nutshell, for each fruit (f) present in a given level, the name will be randomly assigned (e.g. "apple") which will then be reflected in which sprite is drawn and what score is associated with it. The animation is then looped infinitely using the play method.
Incrementing the score
Whenever the player collides with a fruit, it consumes it. This means that we need to do several things when we catch this:
- Play a sound to give audio feedback to the user that they just "ate" a fruit
- Play an animation to give visual feedback to the user that the fruit has been "consumed"
- Wait some time for the animation to finish playing (in this case, empirically set at 200ms)
- Destroy the sprite from the canvas
- Increment the score based on which fruit was consumed
- Update the score on the canvas
Phew 😮💨 That's a lot of things! But that's all this async4 function does:
player.onCollide("fruits", async (fruit) => {
  play("coin");
  fruit.play("collected");
  await wait(0.2);
  destroy(fruit);
  score += FRUIT_SCORES[fruit.name];
  currentScore.text = `Score: ${score}`;
});
The await wait(0.2) line is necessary to pause the execution of the code until 200ms have passed, this will allow the collected animation to finish, otherwise we would not even see it.
Outro
All in all, I would say that it was relatively easy to make this small game. I had some grievances with Kaboom initially, the documentation was a bit lacking at times, so I resorted to the old and tried method of trial and error. Some examples were also not working at all (that may be due to my browser). But overall I would say it's a solid game programming library to get started with game development. I would suggest moving to a more rounded, proven and widely adopted game programming library once you want to seriously invest time into building a proper game. It's worth considering game engines too, e.g. Godot or Unity.
Footnotes
- A tilemap is a grid-based representation of a game level comprised of tiles ↩
- A recipe is essentially a series of commands that make runs ↩
- A rule is comprised of 3 parts: a target, prerequisites/dependencies, and a recipe ↩
- An
asyncfunction permits working with asynchronous operations using theasyncandawaitkeywords ↩