Publishing a Python package to extract, process, and analyse Apple HealthKit data
Show Table of Contents
📦 PyPI: https://pypi.org/project/apple-health-parser/
📝 Documentation: https://alxdrcirilo.dev/apple-health-parser
Preface
I've been a happy owner of an Apple Watch for about 4 years now. I must say that I was apprehensive about acquiring one at first, but I've quickly grown to love it. I initially bought one shortly after the COVID-19 pandemic started with the intent of motivating myself to remain active. Little did I know how useful and practical it would be to own one in everyday life, in my experience. Beyond the usual health tracking features associated with smartwatches, some of the use cases of the Apple Watch that I often make use of extend to setting reminders on the fly, recording workouts, checking the weather with one quick glance, and controlling my smart home devices directy from my wrist.
Sneak peek
Here are some of the plots that Apple Health Parser can generate:
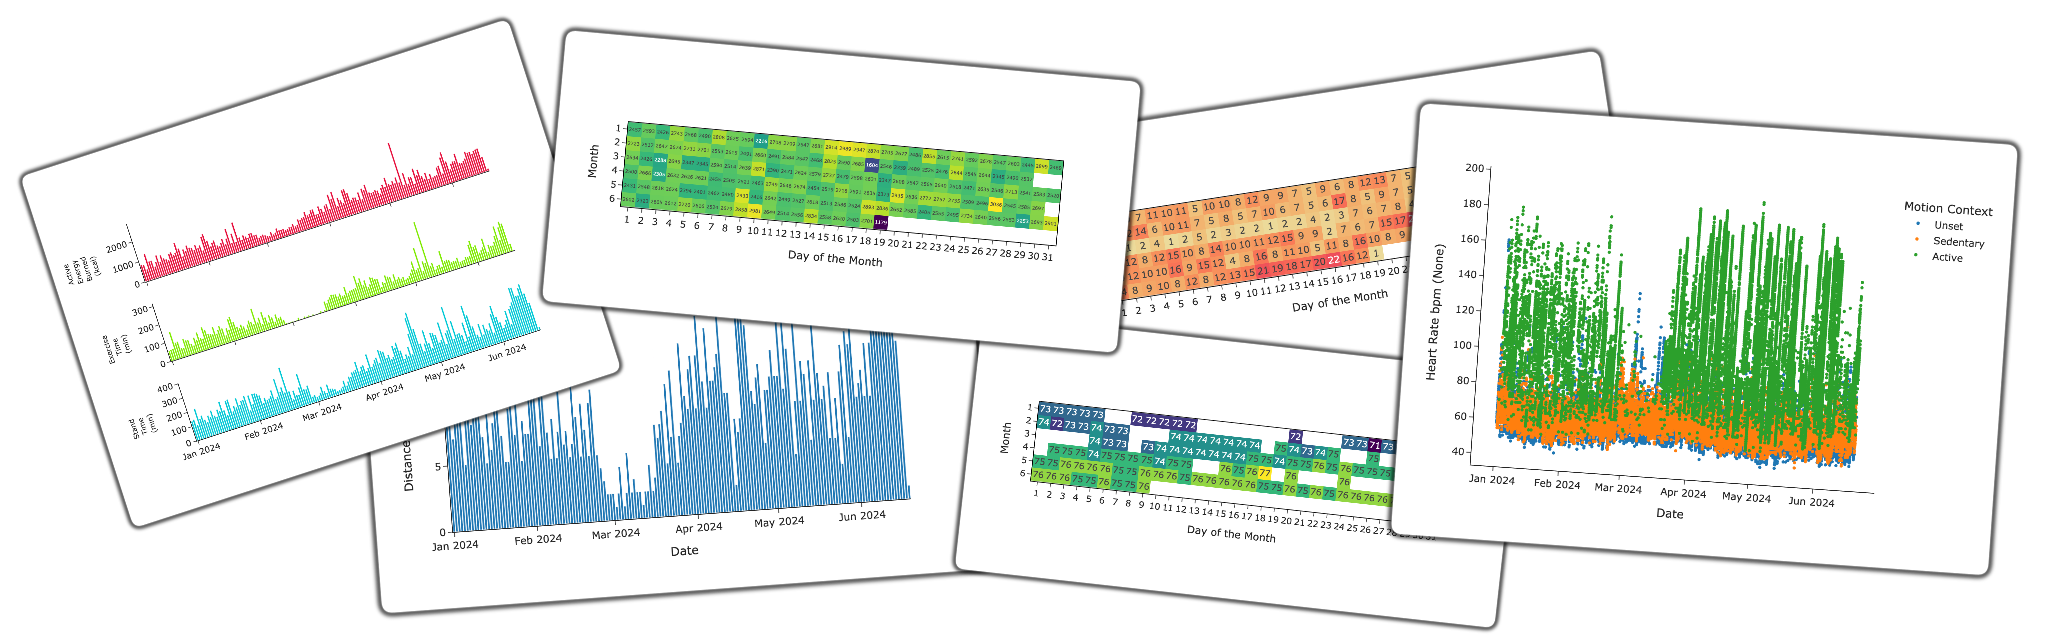
Some plots generated with Apple Health Parser.
Motivation
You may ask:
"But, why would you build a Python package when you can already visualise most metrics straight from your iPhone?"
Well, I'm a big data science nerd 🤓 I love finding new ways to visualise data. Every collection of (semi-)structured data has a story, and the fun part of data visualisation is finding a way to tell that story in a clear but memorable way.
Building the Apple Health Parser
Purpose
In a nutshell, Apple Health Parser aims to be able to perform:
- Extraction and processing of health records from Apple HealthKit data1
- Parsing and validation of health records
- Plotting (optionally interactive) health records
- Exporting plots and tables from the parsed health records in CSV2 format
Implementation
At the moment of writing of this blog post, the latest version is apple-health-parser==0.5.0. The design choices I will discuss herein reflect versions <=0.5.0, with no guarantee that they will remain in effect in future versions of the package.
There are four main classes (only two are directly used by users - marked by *) in Apple Health Parser:
Loader(inloader.py)Parser* (inparser.py)Preprocessor(inpreprocessor.py)Plot* (inplots.py)
In addition to these main classes, a project-wide logger is defined in logging.py.
Loader
The Loader class encapsulates all the logic needed to extract the XML data from the export.zip generated by the Health app on the iPhone.
Additionally, it also gets the records (i.e. health metrics) and logs some metadata (e.g. export date, birthday, etc.). All four methods in this class are actually static methods (i.e. they are decorated with @staticmethod). Although the functions could indeed have been defined in the global scope (i.e. without being defined within a class), I preferred having them within the Loader class in order to logically group them under a single namespace. These methods are essentially utility functions that don't share state but are related (i.e. they are used in loading the data). In my opinion, this keeps the code more cohesive and it also avoid polluting the global scope.
As a small example, here's the read_xml method of the Loader class:
@staticmethod
def read_xml(xml_file: Path) -> list[ET.Element]:
    """
    Read an XML file and return the root element.

    Args:
        xml_file (Path): Path to the XML file

    Returns:
        list[ET.Element]: List of records (ET.Element)
    """
    logger.info(f"Processing {xml_file}...")
    with open(xml_file, "r") as file:
        root = ET.parse(file).getroot()
        Loader._log_metadata(root)
        return root.findall("Record")
This method is responsible for reading an XML file and returning a list of records as ET.Element objects. The method takes a single argument xml_file, which is the path to the Apple Health XML file (i.e. export.xml). The method begins by logging a message indicating the file being processed. It then opens the file (in read-mode - "r") and reads its contents. It then gets the root element of the XML tree, logs some metadata by calling the private method _log_metadata (i.e. locale, export data, and user metadata), and lastly, it returns a list of ET.Element objects representing the records (i.e. elements with a tag name "Record") in the XML file.
Parser
The Parser class is the bread and butter of the Apple Health Parser package. It is designed to parse the Apple Health export XML file. It inherits from the Loader class, meaning that the end-user will never have to directly interact with the Loader class as the Parser class will already internally call the appropriate methods to extract the records from the export.zip file.
There are a couple of important methods defined in Parser, the most relevant one being the get_flag_records method. In essence, this function requires a flag or list of flags - health metric(s) (e.g. HKQuantityTypeIdentifierHeartRate represents heart rate records; table of supported flags), and it will return a ParsedData object (or dictionary with keys as flags and values as ParsedData objects). Furthermore, the function is decorated with a @timeit decorator that will just print the execution time of the function to stdout.
@timeit
def get_flag_records(
    self, flag: str | list[str]
) -> ParsedData | dict[str, ParsedData]:
    """
    Get parsed data based on the given flag.

    Args:
        flag (str | list[str]): Flag to parse the records (e.g., `"HKQuantityTypeIdentifierHeartRate"`)

    Returns:
        ParsedData | dict[str, ParsedData]: Parsed data based on the flag(s)
    """

    def _get_parsed_data(flag: str) -> ParsedData:
        sources = self.get_sources(flag=flag)
        models = self._build_models(flag=flag)
        dates = self._get_dates(models=models)
        records = pd.DataFrame([model.model_dump() for model in models])
        return ParsedData(flag=flag, sources=sources, dates=dates, records=records)

    if isinstance(flag, str):
        return _get_parsed_data(flag=flag)

    elif isinstance(flag, list):
        return {f: _get_parsed_data(flag=f) for f in flag}
"What is the
ParsedDataobject?"
The ParsedData object is a dataclass in Python designed to store parsed data from the Apple Health export file. It contains four fields: flag (e.g. "HKQuantityTypeIdentifierHeartRate"), sources (e.g. "Alexandre's Apple Watch"), dates (set of datetime.date), and records (pandas DataFrame containing the actual records of the parsed data).
@dataclass
class ParsedData:
    """
    Dataclass to store parsed data from the Apple Health export file.
    """

    flag: str
    sources: list[str]
    dates: set[date]
    records: pd.DataFrame

    def __str__(self) -> str:
        """
        String representation of the ParsedData class.
        Includes the flag, sources, dates, and number of records.

        Returns:
            str: String representation of the ParsedData class
        """

        description = [
            f"{'Flag:':<12}{self.flag}",
            f"{'Sources:':<12}{len(self.sources)} sources",
            f"{'Dates:':<12}{len(self.dates)} dates",
            f"{'Records:':<12}{len(self.records)} records",
        ]

        max_len = len(max(description, key=len))
        description = [f"{'ParsedData':=^{max_len}}"] + description

        return "\n".join(description)
It also includes a __str__ method to provide a string representation of the instance, detailing the flag, number of sources, dates, and records in a human-readable format.
💡 Tip: Using f-string formatting (also called literal string interpolation), we can pretty print our string! Here's a very useful cheatsheet.
When you print a ParsedData object, you will see something similar to the following in your terminal:
> print(parsed_data)
=====================ParsedData=====================
Flag:       HKQuantityTypeIdentifierRestingHeartRate
Sources:    3 sources
Dates:      144 dates
Records:    145 records
Coming back to the get_flag_records method, now that we now what ParsedData represents, we see that it actually just performs a series of tasks by calling the appropriate methods to generate ParsedData object(s).
One line is particularly important:
models = self._build_models(flag=flag)
This is essentially the data validation step. Under the hood, this private method is responsible for building Pydantic models, which leads us to the next subsection.
Data validation using Pydantic models
An Apple Health record (in this case, heart rate record) looks something like this:
<Record type="HKQuantityTypeIdentifierHeartRate" sourceName="Alexandre’s Apple Watch" sourceVersion="10.2" device="..., name:Apple Watch, manufacturer:Apple Inc., model:Watch, hardware:Watch6,7, software:10.2>" unit="count/min" creationDate="2024-01-01 01:01:42 +0200" startDate="2024-01-01 01:01:36 +0200" endDate="2024-01-01 01:01:36 +0200" value="74">
<MetadataEntry key="HKMetadataKeyHeartRateMotionContext" value="0"/>
</Record>
In Apple Health Parser, models are defined in records.py and used to validate data from the records like the one shown above.
As an example, let's take a look at the HeartRateData model which is derived from the HealthData model.
class MotionContext(StrEnum):
    UNSET = "0"
    SEDENTARY = "1"
    ACTIVE = "2"


class HeartRateData(HealthData):
    device: str = Field(title="Device", description="Device used for measurement")
    motion_context: str = Field(
        alias="motionContext",
        title="Motion Context",
        description="Context of motion (e.g. sedentary, active, unset)",
        examples=["Unset", "Sedentary", "Active"],
    )

    @field_validator("motion_context", mode="before")
    @classmethod
    def check_motion_context(cls, v: str) -> str:
        return MotionContext(v).name.lower().capitalize()
The HeartRateData model defines all the fields defined in the HealthData model and extends it by adding two additional fields: device, and motion_context. The former is self-explanatory, whilst the latter defines the type of motion context associated with the heart rate record - i.e. "unknown", "sedentary", or "active". To represent the motion context, we use a StrEnum. Notice that there is a method check_motion_context decorated with @field_validator. The mode="before" argument specifies that this validation should be performed before the field is set. This method is responsible for setting the appropriate motion context into a human-readable format (e.g. "Active") in the motion_context field.
Using Pydantic models ensures that the records parsed from the XML file are correctly structured and valid according to the defined models. This adds a layer of robustness and maintainability to the data parsing logic. This way, if something with the data is unexpected or missing, we can catch it early at the source.
Plot
The Plot class plays a central role in the Apple Health Parser package. But before we can actually plot anything, we need the data to be preprocessed. For this, I picked pandas, a widely adopted data analysis library that integrates very well with plotly. The data preprocessing naturally comes after data validation using pydantic, i.e. after the models have been built and validated. Most data will be similar, with some variations for special cases (e.g. heart rate data has motion context metadata, sleep data has sleep phases metadata, etc.). Same goes for plotting, with most plots being similar in the way they are generated with slight variations (e.g. x-axis column name of the pandas DataFrame, title, legend, etc.). And this leads to a really cool concept in programming: interfaces.
Interfaces
In simple terms, an interface defines a set of abstract methods that a class must implement. This ensures that any class that implements the interface will have a certain set of functionalities. It gives us the ability to define how a class should look without specifying the details of the implementation. Furthermore, it can also help us avoid unnecessary code duplication, promoting the use of polymorphism - classes can be treated through the same interface despite having different internal implementations. If you think of it at a high level, an interface is like a blueprint that you can reuse all over your codebase.
There are multiple ways to define an interface in Python, but for this project I decided to make use of Abstract Base Classes, also called ABCs.
🗒️ Note: In Python, abstract methods are defined by decorating a method with
@abstractmethod.
In Apple Health Parser, the Plot class inherits from PlotInterface. Here's part of what this interface looks like:
from abc import ABC, abstractmethod

class PlotInterface(ABC):
    @abstractmethod
    def _get_figure(self, data):
        # Implement case-specific method to get figure

    def plot(self):
        figure = self._get_figure()
        # Do something with figure
We use the @abstractmethod decorator to make the _get_figure method abstract, i.e. any subclass of PlotInterface needs to implement _get_figure. You'll notice that there is also another method in this example - the plot method. This is a regular (or concrete) method - a method that provides a concrete implementation. This method is designed to call the _get_figure method to obtain a figure and them perform a set of operations that are ubiquitous to any possible subclass of PlotInterface, i.e. showing and saving the plot. This way, we do not need to implement it in subclasses of PlotInterface. On the other hand, _get_figure is case-specific, e.g. heatmaps have different requirements than standard plots (e.g. scatter plots) in the plotly library.
CI/CD
This project was the first time I went the extra mile to set up proper CI/CD3. CI/CD done right can have a tremendous impact on a project, including: faster release cycles (thanks to automated testing, formatting, and linting) and bug detection, increased reliability (less human error), and immediate feedback, among others.
This project is hosted on GitHub and makes use of GitHub Actions - a CI/CD platform to automate build, test, and deployment pipelines defined in so-called workflows. For the Apple Health Parser package, I've defined four workflows:
- Commit lint and semantic versioning (using
commitlintandpython-semantic-release) - Unit test coverage (using
pytestandpytest-cov, with the coverage report uploaded to Coveralls) - Deploy documentation to GitHub Pages (using
mkdocs) - Publish to PyPI (using
poetry-publish)
Outro
If you're interested in reading more about interfaces, and abstract base classes in particular, I highly recommend the following reads:
- "Is it a good practice to put common methods to an abstract class in Python?" - Stack Overflow
- Implementing an Interface in Python - RealPython